Christopher Bill joins the show to talk about the musicianship, hardware, software, and creative process behind his viral YouTube channel, Classical Trombone.
Robby explains the software, hardware, and teaching strategies he uses to run engaging and effective music rehearsals in a remote or hybrid environment.
This information was presented earlier this month at the Maryland Music Educators Association conference. The notes and links below are from the session notes of that presentation.
Learn the strategies and technologies to run engaging synchronous rehearsals. Engage students visually and speed up your flow using Open Broadcasting Software. Pump the sound video/music/play-along tracks directly through Zoom or Google Meet for a lag-free experience. Explore play along with resources, student reflection with Google Docs, effective camera/mic practices, and have students working collaboratively in synchronous chamber ensembles with Soundtrap! Software discussed includes: Keynote, Google Slides, Loopback, Soundsource, Farrago, AnyTune, Soundtrap, Smartmusic!
Tip! – In order to zoom in on your screen on a Mac while presenting, you can do the following: Go to System Preferences—>Accessibility—>Zoom and check on “Use scroll gesture with moifier keys to zoom.” I set up my modifier key as Control so that when I hold Control and scroll up, my screen zooms in.
Technology trainer and speaker, Katie Wardrobe, joins the show to talk about producing technology training and resources for music teachers. (And way more)
David MacDonald returns to the show to talk about the hardware and software in our virtual teaching setups. Then we speculate about touchscreen Macs and consider how Apple’s recent App Store policies might impact the future of creative professional software on iOS.
MusicFirst offers music educators and their students easy-to-use, affordable, cloud-based software that enables music learning, creation, assessment, sharing, and exploration on any device, anywhere, at any time.
MusicFirst Classroom is the only learning management system designed specifically for K-12 music education. It combines the flexibility of an LMS with engaging content and powerful software integrations to help manage your students’ progress, make lesson plans, and create assignments.
And for younger students, MusicFirst Junior is the perfect online system for teaching elementary general music. It includes a comprehensive K-5 curriculum, hundreds of lessons & songs, and kid-friendly graphics to making learning and creating music fun!
Whether you’re teaching remotely, in-person, or in a blended learning environment, MusicFirst will work with you to find a solution that fits your program’s unique needs. Try it free for 30 days at musicfirst.com.
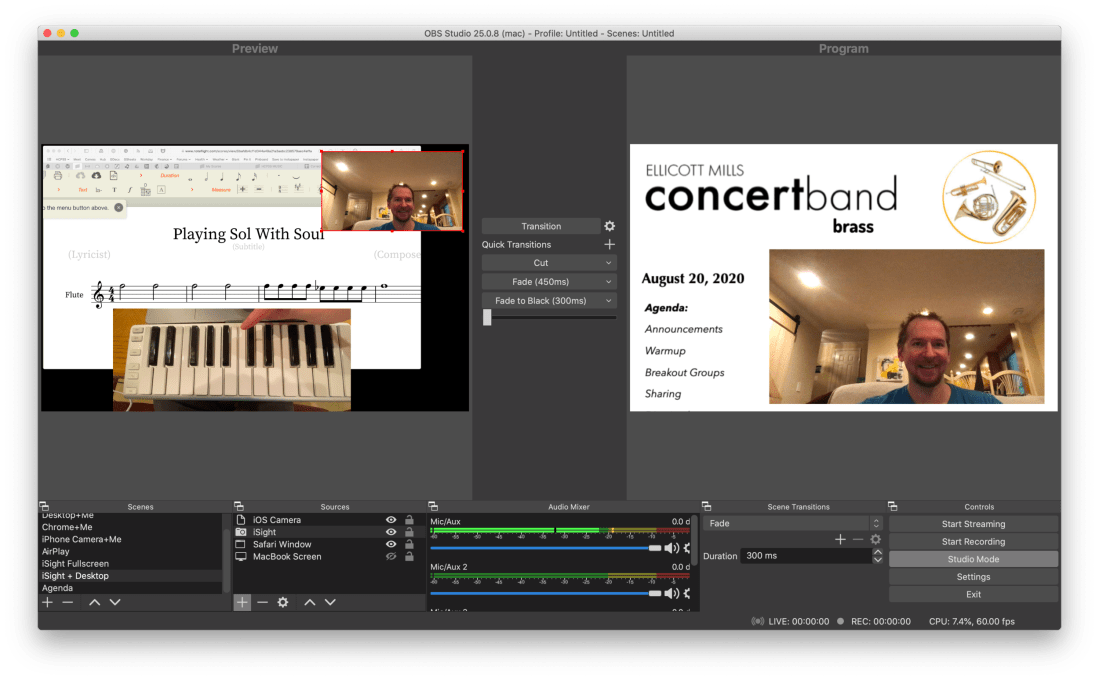
OBS allows me to combine multiple sources into engaging scenes that I can easily transition between. The right video represents the scene that is live for my students to see in Google Meet. The left represents the scene I have queued up to go live when I press a transition button.
It links seamlessly to most streaming services and by installing this plugin, you can have the output of your broadcast be the input of your Google Meet, Zoom, or Microsoft Teams classroom. This pairs really well with my Loopback workflow, which has now become the basis for all audio input in my online classes.
<div class="
      image-block-outer-wrapper
      layout-caption-below
      design-layout-inline
      combination-animation-none
      individual-animation-none
      individual-text-animation-none
    ">


    <figure class="
          sqs-block-image-figure
          intrinsic
        " style="max-width:488px">


      <div class="image-block-wrapper">
        <div class="sqs-image-shape-container-element


          has-aspect-ratio
        " style="position: relative;padding-bottom:165.98361206054688%;overflow: hidden">


            <img src="https://images.squarespace-cdn.com/content/v1/5595df9ce4b0ce9ff9ecd1a8/1598190670478-XLRMXXYV7S06B09RO9O6/CleanShot+2020-08-23+at+09.50.31%402x.png" alt="The sources that can make up your scenes." width="488" height="810" style="display:block;object-fit: cover;width: 100%;height: 100%;object-position: 50% 50%" loading="lazy">

        </div>
      </div>


      <figcaption class="image-caption-wrapper">
        <div class="image-caption"><p class="">The sources that can make up your scenes.</p></div>
      </figcaption>


    </figure>


</div>
OBS allows you to create scenes that combine different video sources, graphics, backgrounds, and microphones, and rapidly switch between them. You could have a scene that is just your web cam’s view of your face talking or another one that combines a window of your web browser with your webcam’s view of your face in the lower right corner. You could even have an image from your hard drive as a graphic in the upper corner of a scene, or as a static image or background.
The video on the right represents the live broadcast, whether that be a Twitch Stream, Facebook Live, or your end of a video call.
The video on the left represents a preview of whatever scene you currently have selected. Pressing the transition buttons in between the two videos makes whatever is on the left go live.
The scenes and transitions can make your videos look very professional. I am all about this idea of making my classes feel like a Twitch live stream. This is the online video language that holds people, particularly young people’s, attention. Why not try to imitate it if it makes for more engaging music experiences?
So far some of my scenes include:
Webcam: this one projects my face fullscreen
Chrome+Me: displays a Chrome window with my webcam feed in the lower corner
Desktop+Me: same as above but shows my entire screen instead of a Chrome window
AirPlay: using AirServer (directions here), I can stream my iPad screen to a scene
iPhone Camera: you can use this app to use your phone as a second camera angle, or just use AirServer and stream your phone with the camera app turned on
Agenda: a static image that represents what would usually be on the board when students enter the room… It’s what they will see when they are joining the Google Meet in the opening minutes of class
And many slight variations of the above
<div class="
      image-block-outer-wrapper
      layout-caption-below
      design-layout-inline
      combination-animation-none
      individual-animation-none
      individual-text-animation-none
    ">


    <figure class="
          sqs-block-image-figure
          intrinsic
        " style="max-width:2304px">


      <div class="image-block-wrapper">
        <div class="sqs-image-shape-container-element


          has-aspect-ratio
        " style="position: relative;padding-bottom:19.96527671813965%;overflow: hidden">


            <img src="https://images.squarespace-cdn.com/content/v1/5595df9ce4b0ce9ff9ecd1a8/1598190795466-PUZHBZMK4XSUWZ4BJYA4/CleanShot+2020-08-23+at+09.52.53%402x.png" alt="Scenes and the sources that they contain." width="2304" height="460" style="display:block;object-fit: cover;width: 100%;height: 100%;object-position: 50% 50%" loading="lazy">

        </div>
      </div>


      <figcaption class="image-caption-wrapper">
        <div class="image-caption"><p class="">Scenes and the sources that they contain.</p></div>
      </figcaption>


    </figure>


</div>
David MacDonald (recent podcast guest) has a great scene where he puts an image of a piano keyboard layout on the bottom of the screen, underneath the view of his webcam. The keys light up blue when he plays them so his music theory students can get a clear idea of what he is talking about. I recommend you check out a post of his if you want to learn how to do it. This post is also more instructive about the steps you need to take to get up and running with OBS and is a great starting point if you want go to this path. Read here: Teaching Tech (Live Keyboard Overlay in Zoom) .
OBS makes transitioning between these scenes really quick and engaging to watch. It’s fun to combine the different sources so that a student can see my screen, my face talking, and an overhead view of my hands on a keyboard all at once. But even the act of transitioning between those three sources smoothly is a big enhancement alone.
OBS has a super helpful community on Reddit and Discord. I didn’t need them that much though. Googling most of my questions yielded quick results from the OBS user forum.
<div class="
      image-block-outer-wrapper
      layout-caption-below
      design-layout-inline
      combination-animation-none
      individual-animation-none
      individual-text-animation-none
    ">


    <figure class="
          sqs-block-image-figure
          intrinsic
        " style="max-width:2500px">


      <div class="image-block-wrapper">
        <div class="sqs-image-shape-container-element


          has-aspect-ratio
        " style="position: relative;padding-bottom:62.19999694824219%;overflow: hidden">


            <img src="https://images.squarespace-cdn.com/content/v1/5595df9ce4b0ce9ff9ecd1a8/1598127653932-SFLDROYKIAI37H51PAOE/CleanShot+2020-08-22+at+15.51.18%402x.png" alt="In Google Meet, Zoom, or Microsoft Teams, you can change the video source from your built in camera to the OBS virtual camera." width="2500" height="1555" style="display:block;object-fit: cover;width: 100%;height: 100%;object-position: 50% 50%" loading="lazy">

        </div>
      </div>


      <figcaption class="image-caption-wrapper">
        <div class="image-caption"><p class="">In Google Meet, Zoom, or Microsoft Teams, you can change the video source from your built in camera to the OBS virtual camera.</p></div>
      </figcaption>


    </figure>


</div>
Edit: I have been using OBS and Keyboard Maestro in combination with the Elago Stream Deck and it is a dream! I hope to blog more about this device soon. See below for a demo of what I was able to get it to do in my first sitting.