I am thrilled to be presenting four sessions at the Ohio Music Educators Association Professional Development Conference this weekend! My third session focuses on communication and collaboration apps for music teams.
If you’d like to attend, the session is on February 8 at 9:30 AM. If you’re already here or have attended, thank you for coming!
This post serves as a resource for session notes, including links to the primary tools I mention, and a complimentary podcast episode.
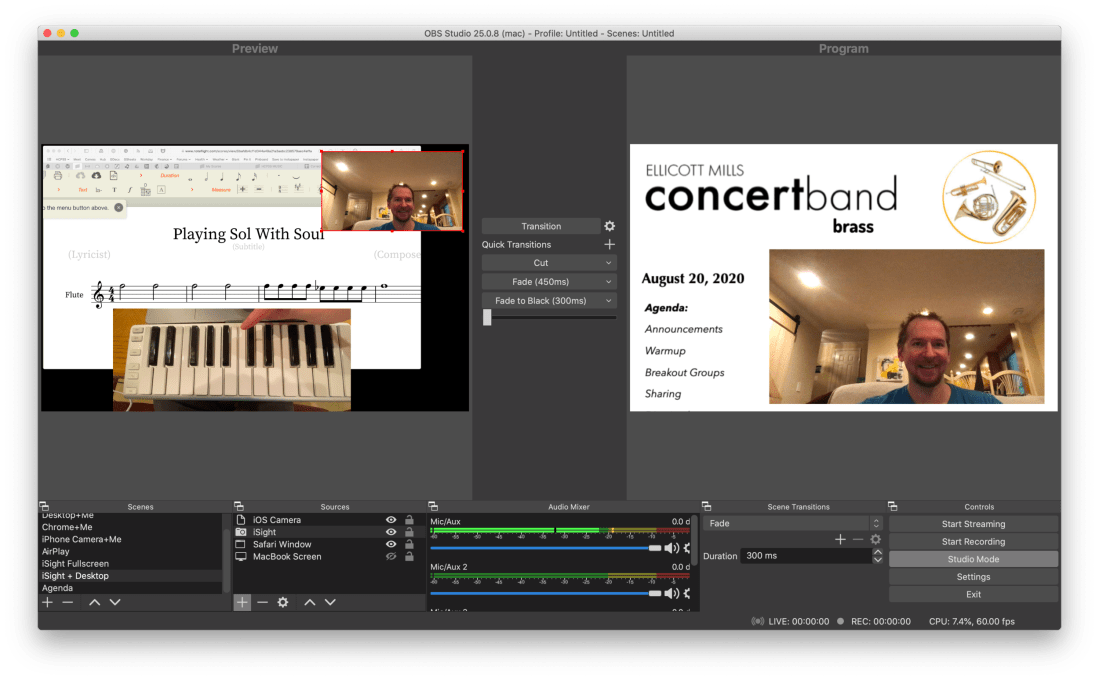
OBS allows me to combine multiple sources into engaging scenes that I can easily transition between. The right video represents the scene that is live for my students to see in Google Meet. The left represents the scene I have queued up to go live when I press a transition button.
It links seamlessly to most streaming services and by installing this plugin, you can have the output of your broadcast be the input of your Google Meet, Zoom, or Microsoft Teams classroom. This pairs really well with my Loopback workflow, which has now become the basis for all audio input in my online classes.
<div class="
      image-block-outer-wrapper
      layout-caption-below
      design-layout-inline
      combination-animation-none
      individual-animation-none
      individual-text-animation-none
    ">


    <figure class="
          sqs-block-image-figure
          intrinsic
        " style="max-width:488px">


      <div class="image-block-wrapper">
        <div class="sqs-image-shape-container-element


          has-aspect-ratio
        " style="position: relative;padding-bottom:165.98361206054688%;overflow: hidden">


            <img src="https://images.squarespace-cdn.com/content/v1/5595df9ce4b0ce9ff9ecd1a8/1598190670478-XLRMXXYV7S06B09RO9O6/CleanShot+2020-08-23+at+09.50.31%402x.png" alt="The sources that can make up your scenes." width="488" height="810" style="display:block;object-fit: cover;width: 100%;height: 100%;object-position: 50% 50%" loading="lazy">

        </div>
      </div>


      <figcaption class="image-caption-wrapper">
        <div class="image-caption"><p class="">The sources that can make up your scenes.</p></div>
      </figcaption>


    </figure>


</div>
OBS allows you to create scenes that combine different video sources, graphics, backgrounds, and microphones, and rapidly switch between them. You could have a scene that is just your web cam’s view of your face talking or another one that combines a window of your web browser with your webcam’s view of your face in the lower right corner. You could even have an image from your hard drive as a graphic in the upper corner of a scene, or as a static image or background.
The video on the right represents the live broadcast, whether that be a Twitch Stream, Facebook Live, or your end of a video call.
The video on the left represents a preview of whatever scene you currently have selected. Pressing the transition buttons in between the two videos makes whatever is on the left go live.
The scenes and transitions can make your videos look very professional. I am all about this idea of making my classes feel like a Twitch live stream. This is the online video language that holds people, particularly young people’s, attention. Why not try to imitate it if it makes for more engaging music experiences?
So far some of my scenes include:
Webcam: this one projects my face fullscreen
Chrome+Me: displays a Chrome window with my webcam feed in the lower corner
Desktop+Me: same as above but shows my entire screen instead of a Chrome window
AirPlay: using AirServer (directions here), I can stream my iPad screen to a scene
iPhone Camera: you can use this app to use your phone as a second camera angle, or just use AirServer and stream your phone with the camera app turned on
Agenda: a static image that represents what would usually be on the board when students enter the room… It’s what they will see when they are joining the Google Meet in the opening minutes of class
And many slight variations of the above
<div class="
      image-block-outer-wrapper
      layout-caption-below
      design-layout-inline
      combination-animation-none
      individual-animation-none
      individual-text-animation-none
    ">


    <figure class="
          sqs-block-image-figure
          intrinsic
        " style="max-width:2304px">


      <div class="image-block-wrapper">
        <div class="sqs-image-shape-container-element


          has-aspect-ratio
        " style="position: relative;padding-bottom:19.96527671813965%;overflow: hidden">


            <img src="https://images.squarespace-cdn.com/content/v1/5595df9ce4b0ce9ff9ecd1a8/1598190795466-PUZHBZMK4XSUWZ4BJYA4/CleanShot+2020-08-23+at+09.52.53%402x.png" alt="Scenes and the sources that they contain." width="2304" height="460" style="display:block;object-fit: cover;width: 100%;height: 100%;object-position: 50% 50%" loading="lazy">

        </div>
      </div>


      <figcaption class="image-caption-wrapper">
        <div class="image-caption"><p class="">Scenes and the sources that they contain.</p></div>
      </figcaption>


    </figure>


</div>
David MacDonald (recent podcast guest) has a great scene where he puts an image of a piano keyboard layout on the bottom of the screen, underneath the view of his webcam. The keys light up blue when he plays them so his music theory students can get a clear idea of what he is talking about. I recommend you check out a post of his if you want to learn how to do it. This post is also more instructive about the steps you need to take to get up and running with OBS and is a great starting point if you want go to this path. Read here: Teaching Tech (Live Keyboard Overlay in Zoom) .
OBS makes transitioning between these scenes really quick and engaging to watch. It’s fun to combine the different sources so that a student can see my screen, my face talking, and an overhead view of my hands on a keyboard all at once. But even the act of transitioning between those three sources smoothly is a big enhancement alone.
OBS has a super helpful community on Reddit and Discord. I didn’t need them that much though. Googling most of my questions yielded quick results from the OBS user forum.
<div class="
      image-block-outer-wrapper
      layout-caption-below
      design-layout-inline
      combination-animation-none
      individual-animation-none
      individual-text-animation-none
    ">


    <figure class="
          sqs-block-image-figure
          intrinsic
        " style="max-width:2500px">


      <div class="image-block-wrapper">
        <div class="sqs-image-shape-container-element


          has-aspect-ratio
        " style="position: relative;padding-bottom:62.19999694824219%;overflow: hidden">


            <img src="https://images.squarespace-cdn.com/content/v1/5595df9ce4b0ce9ff9ecd1a8/1598127653932-SFLDROYKIAI37H51PAOE/CleanShot+2020-08-22+at+15.51.18%402x.png" alt="In Google Meet, Zoom, or Microsoft Teams, you can change the video source from your built in camera to the OBS virtual camera." width="2500" height="1555" style="display:block;object-fit: cover;width: 100%;height: 100%;object-position: 50% 50%" loading="lazy">

        </div>
      </div>


      <figcaption class="image-caption-wrapper">
        <div class="image-caption"><p class="">In Google Meet, Zoom, or Microsoft Teams, you can change the video source from your built in camera to the OBS virtual camera.</p></div>
      </figcaption>


    </figure>


</div>
Edit: I have been using OBS and Keyboard Maestro in combination with the Elago Stream Deck and it is a dream! I hope to blog more about this device soon. See below for a demo of what I was able to get it to do in my first sitting.
Theresa Hoover Ducassoux joins the show to talk about technology for teaching band at a distance, productivity methodologies, Google apps for personal and school use, Flipgrid, empowering students, and more…
Other topics:
Personal productivity systems and apps
The Getting Things Done Methodology
Teaching band online
Being creative with whatever teaching scenario and schedule your district is moving forward with this fall
Engaging students with musical performance using the Flipgrid video service
Google apps for personal productivity
Google apps for classroom teaching
Organizing files in Google Drive
Automating band warm ups
Chamber music breakout groups using Google Meet and Soundtrap
Getting Google Certified
Her book- Pass the Baton: Empowering All Music Students