
I really enjoyed this video of awesome, free, Mac apps. I use and give my thumbs up to most of the apps in this video and even learned about a new one or two myself.
Tag: Mac apps
Craft Pro currently free for teachers and students

Students and Teachers out there, how about Craft Pro for Free? 🤯 Our Back to School offer 🎒 just started and will be available until the end of September! 💥 As of the latest release: Customisation Options + Widget + Shortcuts Update = ❤️ https://t.co/Ps4p7S905W
— Craft.do (@craftdocsapp) August 9, 2021
https://platform.twitter.com/widgets.js
Craft Download here is an app that has been getting a lot of attention in the Apple community lately for the way it makes the process of organizing and sharing information very elegant.
They are currently offering the pro version for FREE to teachers and students. Make sure you check out the tweet above for more details.
In their own words, Craft is a “tool for creating beautiful documents and notes and sharing your thoughts. Everything you create in Craft can be shared with one tap. Craft supports inline markdown, backlinks, code snippets, images, videos, attaching PDF files, and rich link previews.”
Craft is on iOS and macOS and is worth checking out.
It’s hard to pin down exactly how it might serve you because it is extremely versatile. If you like organizing and sharing your ideas, particularly if you are a lukewarm Google Docs user, this is worth a look.
Automatic Instrument Rental Forms, with Keyboard Maestro
One of the things I hate the most about the beginning of the school year is managing instrument rental. It just takes too long to log student instrument needs, cross reference them with my inventory, and type out all of my loan agreements. So I automated a part of that process.
Using the app Keyboard Maestro it is possible to automate almost anything under the sun using a simple graphic user interface. Imagine tons of actions available in macOS presented as draggable blocks that you can stack on top of one another and initiate with a keystroke, by time of day, or by an event happening on your machine. It’s like building with legos. And the sky is the limit.
Watch my automation in action. I have set it up to prompt me for some information about the instrument and student. Once entered, it makes a copy of the selected file in Finder, copies it, and names it after the student. Then Keyboard Maestro waits for my next click. After clicking in the upper-leftmost field, KM fills in the rest and saves the document.
If you want to break apart the logic of it, see the image below to get an idea which triggers and actions I have used to set up the automation. If you are a KB expert and know how I can make it more efficient, let me know! If you are new to the app and need help, let me know! Patreon supporters can get access to the actual macro, install it into your own copy of Keyboard Maestro, and edit it to your liking.
<div class="
      image-block-outer-wrapper
      layout-caption-below
      design-layout-inline
      combination-animation-none
      individual-animation-none
      individual-text-animation-none
    ">


    <figure class="
          sqs-block-image-figure
          intrinsic
        " style="max-width:1242px">


      <div class="image-block-wrapper">
        <div class="sqs-image-shape-container-element


          has-aspect-ratio
        " style="position: relative;padding-bottom:958.6151123046875%;overflow: hidden">


            <img src="https://images.squarespace-cdn.com/content/v1/5595df9ce4b0ce9ff9ecd1a8/1629119409586-P2I9JUXUEEST8LWVPMC9/image.png" alt="" width="1242" height="11906" style="display:block;object-fit: cover;width: 100%;height: 100%;object-position: 50% 50%" loading="lazy">

        </div>
      </div>


    </figure>


</div>
Routing Audio from Your Apps Directly Into Your Zoom Call (Or Other Voice Chat App) with Loopback
UPDATE: Learn more about Loopback from my interview with CEO Paul Kafasis on my podcast. Listen and subscribe below…
Listen on Apple PodcastsListen on SpotifyRSS Feed
<div class="
      image-block-outer-wrapper
      layout-caption-below
      design-layout-inline
      combination-animation-none
      individual-animation-none
      individual-text-animation-none
    ">


    <figure class="
          sqs-block-image-figure
          intrinsic
        " style="max-width:512px">


      <div class="image-block-wrapper">
        <div class="sqs-image-shape-container-element


          has-aspect-ratio
        " style="position: relative;padding-bottom:100%;overflow: hidden">


            <img src="https://images.squarespace-cdn.com/content/v1/5595df9ce4b0ce9ff9ecd1a8/1595452750007-D26OAX2RKZQIH3PLZ874/loopback%402x.png" alt="Loopback is an app that creates custom audio ins and outs for the Mac using the audio of other apps." width="512" height="512" style="display:block;object-fit: cover;width: 100%;height: 100%;object-position: 50% 50%" loading="lazy">

        </div>
      </div>


      <figcaption class="image-caption-wrapper">
        <div class="image-caption"><p class="">Loopback is an app that creates custom audio ins and outs for the Mac using the audio of other apps.</p></div>
      </figcaption>


    </figure>


</div>
Have you been teaching a class in Google Meet or Zoom and wanted to play a song from iTunes for your digital classroom? Or perhaps a YouTube video or any other application with audio?
Sure, you can play it right on your computer and let the audio from your speakers go straight back into the microphone input of your computer. This works ok in my opinion. But it isn’t going to produce a pure representation of the audio I am trying to send. And in some cases, it creates issues with echo, delay, or a nasty feedback loop.
So what do you do? Rogue Amoeba makes excellent Mac apps that, for lack of better explanation, hack into the audio system of your Mac. I have written about Audio Hijack here before, their app that allows you to record audio from other applications (and that’s just the start of all the powerful things it can do). Rogue Amoeba also makes an excellent utility called Loopback.
What does Loopback do? Think about your computer’s audio settings. You have an Input and an Output. The Input is, by default, your computer microphone, and the Output is the speakers. If you connect an audio interface that has higher quality microphone and speakers plugged in, you would need to set the Input and Output to that interface to get the input and out put the be the microphone and speakers, respectively.
<div class="
image-block-outer-wrapper
layout-caption-below
design-layout-inline
combination-animation-none
individual-animation-none
individual-text-animation-none
">
<figure class="
sqs-block-image-figure
intrinsic
" style="max-width:2224px">
<div class="image-block-wrapper">
<div class="sqs-image-shape-container-element
has-aspect-ratio
" style="position: relative;padding-bottom:55.035972595214844%;overflow: hidden">
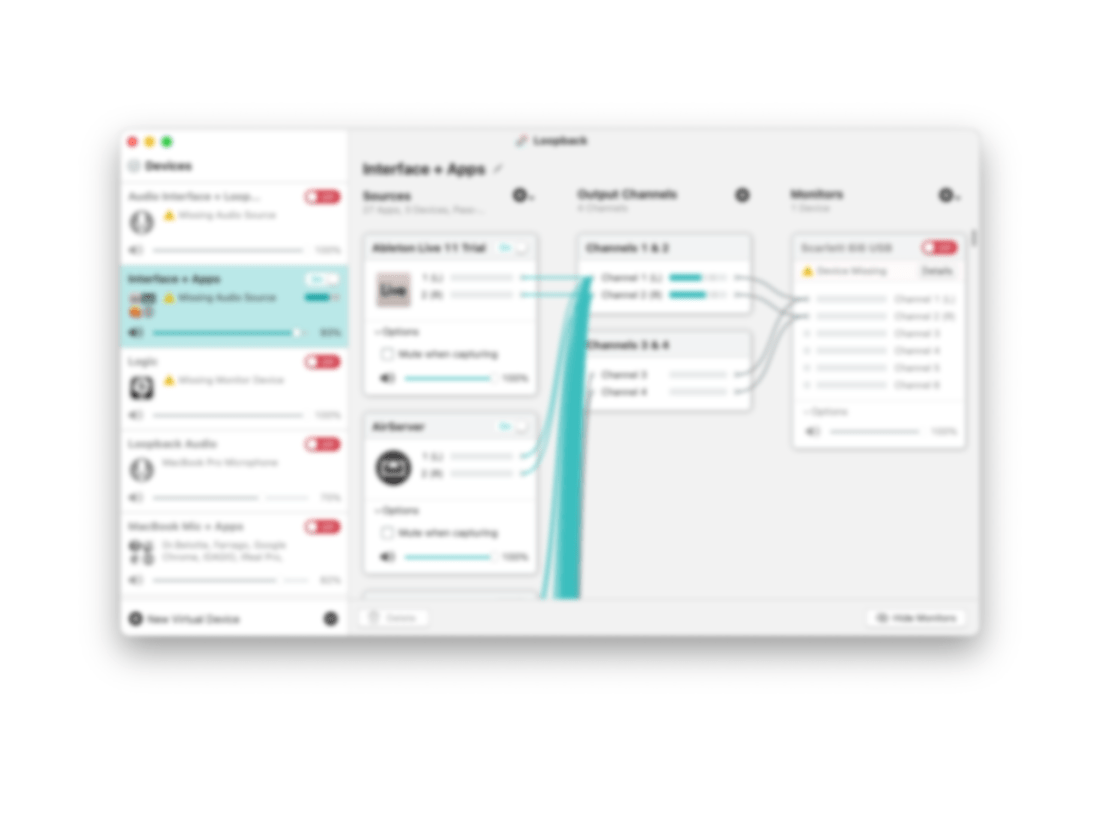
<img src="https://images.squarespace-cdn.com/content/v1/5595df9ce4b0ce9ff9ecd1a8/1595453574122-OW83Y83K7XW3RVX5EOY1/CleanShot+2020-07-22+at+17.31.48%402x.png" alt="Usually my computer microphone is a Device that can be set to the computer’s Input. In the scenario above, Loopback has allowed me to combine the audio from my microphone and the Music app into a new audio Device called “Music+Mic” that can be selec…" width="2224" height="1224" style="display:block;object-fit: cover;width: 100%;height: 100%;object-position: 50% 50%" loading="lazy">
</div>
</div>
<figcaption class="image-caption-wrapper">
<div class="image-caption"><p class="">Usually my computer microphone is a Device that can be set to the computer’s Input. In the scenario above, Loopback has allowed me to combine the audio from my microphone and the Music app into a new audio Device called “Music+Mic” that can be selected as the input of my Mac or any individual app.</p></div>
</figcaption>
</figure>
</div>
Your Inputs and Outputs can be controlled from the Sound settings of your computer. Some audio apps also let you control how, specifically, they behave. For example, I have manually set up GarageBand and Skype to use my audio interface as the Device I use for input so that whether I am recording for my podcast, or simply catching up with a relative, they hear me through the microphone, no matter what Device my Mac’s audio Output is set to in the System Preferences.
Loopback allows you to create Inputs and Outputs that are accessible to your Mac’s Sound settings as well as your apps. In the example above, I have created an Input that combines my Mac’s microphone (the usual Input) with the output of the Apple Music app, something I might want to use to play a recording example for my students in a Google Meet.
<div class="
      image-block-outer-wrapper
      layout-caption-below
      design-layout-inline
      combination-animation-none
      individual-animation-none
      individual-text-animation-none
    ">


    <figure class="
          sqs-block-image-figure
          intrinsic
        " style="max-width:1560px">


      <div class="image-block-wrapper">
        <div class="sqs-image-shape-container-element


          has-aspect-ratio
        " style="position: relative;padding-bottom:78.20512390136719%;overflow: hidden">


            <img src="https://images.squarespace-cdn.com/content/v1/5595df9ce4b0ce9ff9ecd1a8/1595452699201-P28K84NUK3AWBKDPOE50/CleanShot+2020-07-22+at+17.06.46%402x.png" alt="Selecting my new audio Device from the System Preferences." width="1560" height="1220" style="display:block;object-fit: cover;width: 100%;height: 100%;object-position: 50% 50%" loading="lazy">

        </div>
      </div>


      <figcaption class="image-caption-wrapper">
        <div class="image-caption"><p class="">Selecting my new audio Device from the System Preferences.</p></div>
      </figcaption>


    </figure>


</div>
Look now as I go to my computer’s Sound settings, and I can select this new custom Input to be used across the entire operating system! This way, when I am in a Google Meet, students are hearing both me speaking through the mic and all of the output of the Music app.
<div class="
      image-block-outer-wrapper
      layout-caption-below
      design-layout-inline
      combination-animation-none
      individual-animation-none
      individual-text-animation-none
    ">


    <figure class="
          sqs-block-image-figure
          intrinsic
        " style="max-width:2500px">


      <div class="image-block-wrapper">
        <div class="sqs-image-shape-container-element


          has-aspect-ratio
        " style="position: relative;padding-bottom:62.519996643066406%;overflow: hidden">


            <img src="https://images.squarespace-cdn.com/content/v1/5595df9ce4b0ce9ff9ecd1a8/1595452726313-QK1V1G3GMW9N3C0GMI23/CleanShot+2020-07-22+at+17.06.14%402x.png" alt="Now I can route my band warm up tracks, reference recordings, or any other audio I desire, into my Google Meet classrooms." width="2500" height="1563" style="display:block;object-fit: cover;width: 100%;height: 100%;object-position: 50% 50%" loading="lazy">

        </div>
      </div>


      <figcaption class="image-caption-wrapper">
        <div class="image-caption"><p class="">Now I can route my band warm up tracks, reference recordings, or any other audio I desire, into my Google Meet classrooms.</p></div>
      </figcaption>


    </figure>


</div>
🎬 How to Make a Virtual Ensemble!

The school year is finally over, as is my first ever quarter of online teaching.
I wanted my students to end the year seeing themselves represented together, playing the same music, at the same time. So I sharpened my Final Cut skills and dove into the process of making a virtual ensemble.
The video in this post gives an overview of my process for making these videos, all the way from making a play along track, to advanced editing such as pitch and rhythm correction. The video includes a couple of my favorite Mac utilities for manipulating audio and video files. Scroll to the bottom to see all of the final videos of my students.
Apps Mentioned in the Video
If you want free alternatives to the apps in the video, try:
- VLC – for file conversion
- The Amazing Slow Downer – for slowing down audio tracks
To edit on iPadOS, try:
- Ferrite – for audio editing
- LumaFusion – for video editing
Subscribe Links:
Subscribe to the Music Ed Tech Talk Podcast: Apple Podcasts | Overcast | Castro | Spotify | RSS
Buy my book, Digital Organization Tips for Music Teachers
