As previewed last month, Google is starting to launch a handful of pre-announced features for Meet. Background blur and being able to see up to 49 people simultaneously is coming to Google Meet in the coming weeks.
This is going to be huge for teachers. Read the entire article. They explain how to set everything up once this feature rolls out to you.
My band classes meet online using Google Meet once a day for 45 minutes. I am trying to keep them playing as much of this time as possible while slowly introducing the tech tools we will be using to submit work this semester.
Using the Yamaha Harmony Director, plugged in through Logic (along with some trap beats and 808 bass lines I recorded in with software instruments), I have started to make some play-along tracks to route through the Google Meet via Loopback.
See below for the Logic Pro setup. I am using a drummer track for the trap beat, an 808 bass instrument as a software instrument to record the bass line, and the Harmony Director is being recorded live as an audio track. The HD is plugged directly into my audio interface to do this.
I decided to keep the bass part droning in the key area of the scale because that software instrument plays in equal temperament by default. It also sounds more like an authentic trap beat this way, where the bass line functions similar to a bass drum.
I already used this method in my first period class this morning and the band loved it. This is just the beginning. I whipped this together in a hot minute and anticipate making a variety of scale patterns in different musical styles.
David MacDonald returns to the show to talk about the hardware and software in our virtual teaching setups. Then we speculate about touchscreen Macs and consider how Apple’s recent App Store policies might impact the future of creative professional software on iOS.
MusicFirst offers music educators and their students easy-to-use, affordable, cloud-based software that enables music learning, creation, assessment, sharing, and exploration on any device, anywhere, at any time.
MusicFirst Classroom is the only learning management system designed specifically for K-12 music education. It combines the flexibility of an LMS with engaging content and powerful software integrations to help manage your students’ progress, make lesson plans, and create assignments.
And for younger students, MusicFirst Junior is the perfect online system for teaching elementary general music. It includes a comprehensive K-5 curriculum, hundreds of lessons & songs, and kid-friendly graphics to making learning and creating music fun!
Whether you’re teaching remotely, in-person, or in a blended learning environment, MusicFirst will work with you to find a solution that fits your program’s unique needs. Try it free for 30 days at musicfirst.com.
Meet on Chromecast works exclusively through the Chrome browser on your desktop or laptop computer. That’s because, when this is running, Google still uses the camera, microphone, and audio from your machine to power the experience. The meeting itself is just cast off to your TV or other display so you can view it on a larger display. Google is continuing to be quite aggressive with updates to Google Meet.
While I am happy with my tech setup in my studio, I know there will be times when I need a change of scenery. I fully plan to teach some lessons from my sunroom and living room. My living room TV has a Chromecast built in and I can totally see myself projecting the class on to the big screen while providing feedback from my laptop on the couch and using the laptop screen as extra real estate for other apps.
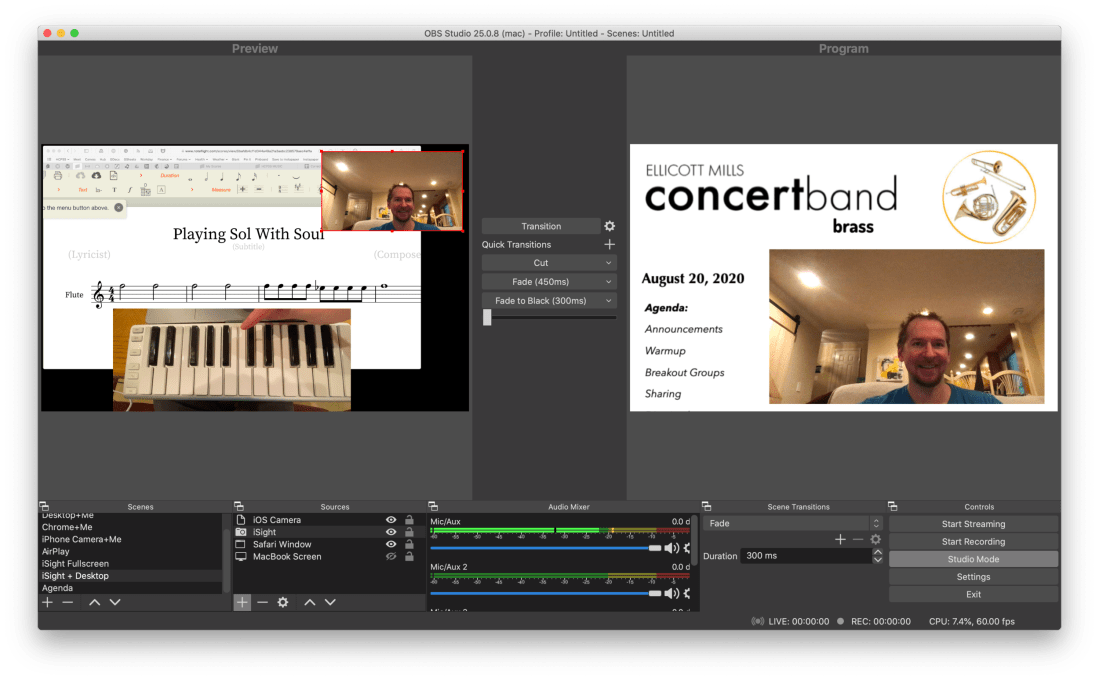
OBS allows me to combine multiple sources into engaging scenes that I can easily transition between. The right video represents the scene that is live for my students to see in Google Meet. The left represents the scene I have queued up to go live when I press a transition button.
It links seamlessly to most streaming services and by installing this plugin, you can have the output of your broadcast be the input of your Google Meet, Zoom, or Microsoft Teams classroom. This pairs really well with my Loopback workflow, which has now become the basis for all audio input in my online classes.
<div class="
      image-block-outer-wrapper
      layout-caption-below
      design-layout-inline
      combination-animation-none
      individual-animation-none
      individual-text-animation-none
    ">


    <figure class="
          sqs-block-image-figure
          intrinsic
        " style="max-width:488px">


      <div class="image-block-wrapper">
        <div class="sqs-image-shape-container-element


          has-aspect-ratio
        " style="position: relative;padding-bottom:165.98361206054688%;overflow: hidden">


            <img src="https://images.squarespace-cdn.com/content/v1/5595df9ce4b0ce9ff9ecd1a8/1598190670478-XLRMXXYV7S06B09RO9O6/CleanShot+2020-08-23+at+09.50.31%402x.png" alt="The sources that can make up your scenes." width="488" height="810" style="display:block;object-fit: cover;width: 100%;height: 100%;object-position: 50% 50%" loading="lazy">

        </div>
      </div>


      <figcaption class="image-caption-wrapper">
        <div class="image-caption"><p class="">The sources that can make up your scenes.</p></div>
      </figcaption>


    </figure>


</div>
OBS allows you to create scenes that combine different video sources, graphics, backgrounds, and microphones, and rapidly switch between them. You could have a scene that is just your web cam’s view of your face talking or another one that combines a window of your web browser with your webcam’s view of your face in the lower right corner. You could even have an image from your hard drive as a graphic in the upper corner of a scene, or as a static image or background.
The video on the right represents the live broadcast, whether that be a Twitch Stream, Facebook Live, or your end of a video call.
The video on the left represents a preview of whatever scene you currently have selected. Pressing the transition buttons in between the two videos makes whatever is on the left go live.
The scenes and transitions can make your videos look very professional. I am all about this idea of making my classes feel like a Twitch live stream. This is the online video language that holds people, particularly young people’s, attention. Why not try to imitate it if it makes for more engaging music experiences?
So far some of my scenes include:
Webcam: this one projects my face fullscreen
Chrome+Me: displays a Chrome window with my webcam feed in the lower corner
Desktop+Me: same as above but shows my entire screen instead of a Chrome window
AirPlay: using AirServer (directions here), I can stream my iPad screen to a scene
iPhone Camera: you can use this app to use your phone as a second camera angle, or just use AirServer and stream your phone with the camera app turned on
Agenda: a static image that represents what would usually be on the board when students enter the room… It’s what they will see when they are joining the Google Meet in the opening minutes of class
And many slight variations of the above
<div class="
      image-block-outer-wrapper
      layout-caption-below
      design-layout-inline
      combination-animation-none
      individual-animation-none
      individual-text-animation-none
    ">


    <figure class="
          sqs-block-image-figure
          intrinsic
        " style="max-width:2304px">


      <div class="image-block-wrapper">
        <div class="sqs-image-shape-container-element


          has-aspect-ratio
        " style="position: relative;padding-bottom:19.96527671813965%;overflow: hidden">


            <img src="https://images.squarespace-cdn.com/content/v1/5595df9ce4b0ce9ff9ecd1a8/1598190795466-PUZHBZMK4XSUWZ4BJYA4/CleanShot+2020-08-23+at+09.52.53%402x.png" alt="Scenes and the sources that they contain." width="2304" height="460" style="display:block;object-fit: cover;width: 100%;height: 100%;object-position: 50% 50%" loading="lazy">

        </div>
      </div>


      <figcaption class="image-caption-wrapper">
        <div class="image-caption"><p class="">Scenes and the sources that they contain.</p></div>
      </figcaption>


    </figure>


</div>
David MacDonald (recent podcast guest) has a great scene where he puts an image of a piano keyboard layout on the bottom of the screen, underneath the view of his webcam. The keys light up blue when he plays them so his music theory students can get a clear idea of what he is talking about. I recommend you check out a post of his if you want to learn how to do it. This post is also more instructive about the steps you need to take to get up and running with OBS and is a great starting point if you want go to this path. Read here: Teaching Tech (Live Keyboard Overlay in Zoom) .
OBS makes transitioning between these scenes really quick and engaging to watch. It’s fun to combine the different sources so that a student can see my screen, my face talking, and an overhead view of my hands on a keyboard all at once. But even the act of transitioning between those three sources smoothly is a big enhancement alone.
OBS has a super helpful community on Reddit and Discord. I didn’t need them that much though. Googling most of my questions yielded quick results from the OBS user forum.
<div class="
      image-block-outer-wrapper
      layout-caption-below
      design-layout-inline
      combination-animation-none
      individual-animation-none
      individual-text-animation-none
    ">


    <figure class="
          sqs-block-image-figure
          intrinsic
        " style="max-width:2500px">


      <div class="image-block-wrapper">
        <div class="sqs-image-shape-container-element


          has-aspect-ratio
        " style="position: relative;padding-bottom:62.19999694824219%;overflow: hidden">


            <img src="https://images.squarespace-cdn.com/content/v1/5595df9ce4b0ce9ff9ecd1a8/1598127653932-SFLDROYKIAI37H51PAOE/CleanShot+2020-08-22+at+15.51.18%402x.png" alt="In Google Meet, Zoom, or Microsoft Teams, you can change the video source from your built in camera to the OBS virtual camera." width="2500" height="1555" style="display:block;object-fit: cover;width: 100%;height: 100%;object-position: 50% 50%" loading="lazy">

        </div>
      </div>


      <figcaption class="image-caption-wrapper">
        <div class="image-caption"><p class="">In Google Meet, Zoom, or Microsoft Teams, you can change the video source from your built in camera to the OBS virtual camera.</p></div>
      </figcaption>


    </figure>


</div>
Edit: I have been using OBS and Keyboard Maestro in combination with the Elago Stream Deck and it is a dream! I hope to blog more about this device soon. See below for a demo of what I was able to get it to do in my first sitting.
When school let out in March, I wrote My Very Straightforward and Very Successful Setup for Teaching Virtual Private Lessons. The impetus for this post, and its snarky title, was an overwhelming number of teachers I saw on Facebook fussing about what apps and hardware they should use to teach online when all you really need is a smartphone, FaceTime, and maybe a tripod.
I stand by that post. But there are also reasons to go high-tech. I have had a lot of time this summer to reflect on the coming fall teaching semester. I have been experimenting with software and hardware solutions that are going to make my classes way more engaging.
Zoom
I have been hesitant about Zoom. I still have reservations about their software. Yet, it is hard to resist how customizable their desktop version is. I will be using Google Meet for my public school classes in September, but for my private lessons, I have been taking advantage of Zoom’s detailed features and settings.
For example, it’s easier to manage audio ins and outs. Right from the chat window, I can change if my voice input is going through my Mac’s internal microphone or my studio microphone, or if video is coming from my laptop webcam or my external Logitech webcam. This will also be useful for routing audio from apps into the call (we will get to that in a moment).
<div class="
      image-block-outer-wrapper
      layout-caption-below
      design-layout-inline
      combination-animation-none
      individual-animation-none
      individual-text-animation-none
    ">


    <figure class="
          sqs-block-image-figure
          intrinsic
        " style="max-width:2500px">


      <div class="image-block-wrapper">
        <div class="sqs-image-shape-container-element


          has-aspect-ratio
        " style="position: relative;padding-bottom:42.20000076293945%;overflow: hidden">


            <img src="https://images.squarespace-cdn.com/content/v1/5595df9ce4b0ce9ff9ecd1a8/1597075201184-OOWEFIAO8PYDRTX1UOAT/CleanShot+2020-08-10+at+11.02.33.png" alt="Zoom allows you to choose the audio/video input from right within the call." width="2500" height="1055" style="display:block;object-fit: cover;width: 100%;height: 100%;object-position: 50% 50%" loading="lazy">

        </div>
      </div>


      <figcaption class="image-caption-wrapper">
        <div class="image-caption"><p class="">Zoom allows you to choose the audio/video input from right within the call.</p></div>
      </figcaption>


    </figure>


</div>
Zoom also allows you to AirPlay the screen of an iOS device to the student as a screen sharing option. This is the main reason I have been experimenting with Zoom. Providing musical feedback is challenging over an internet-connected video call. Speaking slowly helps to convey thoughts accurately, but it helps a lot more when I say “start at measure 32” and the student sees me circle the spot I want them to start in the music, right on their phone.
You can get really detailed by zooming in and out of scores and annotating as little as a single note. If you are wondering, I am doing all of this on a 12.9 inch iPad Pro with Apple Pencil, using the forScore app. A tight feedback loop of “student performance—>teacher feedback—>student adjustment” is so important to good teaching, and a lot of it is lost during online lessons. It helps to get some of it back through the clarity and engagement of annotated sheet music.
<div class="
      image-block-outer-wrapper
      layout-caption-below
      design-layout-inline
      combination-animation-none
      individual-animation-none
      individual-text-animation-none
    ">


    <figure class="
          sqs-block-image-figure
          intrinsic
        " style="max-width:2500px">


      <div class="image-block-wrapper">
        <div class="sqs-image-shape-container-element


          has-aspect-ratio
        " style="position: relative;padding-bottom:42.20000076293945%;overflow: hidden">


            <img src="https://images.squarespace-cdn.com/content/v1/5595df9ce4b0ce9ff9ecd1a8/1597075253336-3D35PXRK7I734NAHHIN8/CleanShot+2020-08-10+at+11.03.17.png" alt="Selecting AirPlay as a screen sharing option." width="2500" height="1055" style="display:block;object-fit: cover;width: 100%;height: 100%;object-position: 50% 50%" loading="lazy">

        </div>
      </div>


      <figcaption class="image-caption-wrapper">
        <div class="image-caption"><p class="">Selecting AirPlay as a screen sharing option.</p></div>
      </figcaption>


    </figure>


</div>


<div class="
      image-block-outer-wrapper
      layout-caption-below
      design-layout-inline
      combination-animation-none
      individual-animation-none
      individual-text-animation-none
    ">


    <figure class="
          sqs-block-image-figure
          intrinsic
        " style="max-width:2500px">


      <div class="image-block-wrapper">
        <div class="sqs-image-shape-container-element


          has-aspect-ratio
        " style="position: relative;padding-bottom:42.20000076293945%;overflow: hidden">


            <img src="https://images.squarespace-cdn.com/content/v1/5595df9ce4b0ce9ff9ecd1a8/1597075390118-QA7W16X26KDSA9LT8512/CleanShot+2020-08-10+at+11.05.43.png" alt="AirPlaying annotated sheet music to the Zoom call using the iPad Pro and forScore app." width="2500" height="1055" style="display:block;object-fit: cover;width: 100%;height: 100%;object-position: 50% 50%" loading="lazy">

        </div>
      </div>


      <figcaption class="image-caption-wrapper">
        <div class="image-caption"><p class="">AirPlaying annotated sheet music to the Zoom call using the iPad Pro and forScore app.</p></div>
      </figcaption>


    </figure>


</div>
As much as I love this, I still think Zoom is pretty student hostile, particularly with the audio settings. Computers already try to normalize audio by taking extreme louds and compressing them. Given that my private lessons are on percussion instruments, this is very bad. Zoom is the worst at it of all the video apps I have used. To make it better, you have to turn on an option in the audio settings called “Use Original Audio” so that the host hears the student’s raw sound, not Zoom’s attempt to even it out. Some of my students report that they have to re-choose this option in the “Meeting Settings” of each new Zoom call.
If this experiment turns out to be worth it for the sheet music streaming, I will deal with it. But this is one of the reasons why I have been using simple apps like FaceTime up until this point.
I have been experimenting with a few apps by Rogue Amoeba that give me more control over how audio is flowing throughout my hardware and software.
Last Spring, I would often play my public school students YouTube videos, concert band recordings from Apple Music, and warm-up play-alongs that were embedded in Keynote slides. I was achieving this by having the sound of these sources come out of my computer speakers and right back into the microphone of my laptop. It actually works. But not for everyone. And not well.
Loopback is an app by Rogue Amoeba that allows you to combine the audio input and output of your various microphones, speakers, and apps, into new single audio devices that can be recognized by the system. I wrote about it here. My current set up includes a new audio device I created with Loopback which combines my audio interface and a bunch of frequently used audio apps into one. The resulting device is called Interface+Apps. If I select it as the input in my computer’s sound settings, then my students hear those apps and any microphone plugged into my audio interface directly. The audio quality of my apps is therefore more pure and direct, and there is no risk of getting an echo or feedback effect from my microphone picking up my computer speaker’s sound.
<div class="
      image-block-outer-wrapper
      layout-caption-below
      design-layout-inline
      combination-animation-none
      individual-animation-none
      individual-text-animation-none
    ">


    <figure class="
          sqs-block-image-figure
          intrinsic
        " style="max-width:1112px">


      <div class="image-block-wrapper">
        <div class="sqs-image-shape-container-element


          has-aspect-ratio
        " style="position: relative;padding-bottom:90.28776550292969%;overflow: hidden">


            <img src="https://images.squarespace-cdn.com/content/v1/5595df9ce4b0ce9ff9ecd1a8/1597075481531-T3RND7H6QZK7U88DPYPF/CleanShot+2020-08-10+at+11.07.26.png" alt="A Loopback device I created which combines the audio output of many apps with my audio interface into a new, compound device called “Interface+Apps.”" width="1112" height="1004" style="display:block;object-fit: cover;width: 100%;height: 100%;object-position: 50% 50%" loading="lazy">

        </div>
      </div>


      <figcaption class="image-caption-wrapper">
        <div class="image-caption"><p class="">A Loopback device I created which combines the audio output of many apps with my audio interface into a new, compound device called “Interface+Apps.”</p></div>
      </figcaption>


    </figure>


</div>


<div class="
      image-block-outer-wrapper
      layout-caption-below
      design-layout-inline
      combination-animation-none
      individual-animation-none
      individual-text-animation-none
    ">


    <figure class="
          sqs-block-image-figure
          intrinsic
        " style="max-width:780px">


      <div class="image-block-wrapper">
        <div class="sqs-image-shape-container-element


          has-aspect-ratio
        " style="position: relative;padding-bottom:78.20512390136719%;overflow: hidden">


            <img src="https://images.squarespace-cdn.com/content/v1/5595df9ce4b0ce9ff9ecd1a8/1597075501814-75OMM2CT6NQU8BBM81BQ/CleanShot+2020-08-10+at+11.08.54.png" alt="I can select this compound device from my Mac’s Sound settings." width="780" height="610" style="display:block;object-fit: cover;width: 100%;height: 100%;object-position: 50% 50%" loading="lazy">

        </div>
      </div>


      <figcaption class="image-caption-wrapper">
        <div class="image-caption"><p class="">I can select this compound device from my Mac’s Sound settings.</p></div>
      </figcaption>


    </figure>


</div>
Now I can do the following with a much higher level of quality…
Run a play-along band track and have a private student drum along
Play examples of professional bands for my band class on YouTube
Run Keynote slides that contain beats, tuning drones, and other play-along/reference tracks
and…
Logic Pro X
Logic Pro X is one of my apps routing through to the call via Loopback. I have a MIDI keyboard plugged into my audio interface and a Roland Octopad electronic drum pad that is plugged in as an audio source (though it can be used as a MIDI source too).
The sounds on the Roland Octopad are pretty authentic. I have hi-hat and bass drum foot pedal triggers so I can play it naturally. So in Logic, I start with an audio track that is monitoring the Octopad, and a software instrument track that is set to a piano (or marimba or xylophone, whatever is relevant). This way, I can model drum set or mallet parts for students quickly without leaving my desk. The audio I produce in Logic is routed through Loopback directly into the call. My students say the drum set, in particular, sounds way better in some instances than the quality of real instruments over internet-connected calls. Isn’t that something…
Obviously, there is a reason I have previously recommended a set up as simple as a smartphone and a tripod stand. Smartphones are very portable and convenient. And simple smartphone apps like FaceTime and Google Duo make a lot of good default choices about how to handle audio without the fiddly settings some of the more established “voice conference” platforms are known for.
Furthermore, I can’t pick up my desk and move it to my timpani or marimba if I need to model something. So I have begun experimenting with multiple camera angles. I bought a webcam back in March (it finally just shipped). I can use this as a secondary camera to my laptop’s camera (Command+Shift+N in Zoom to change cameras).
Alternatively, I can share my iPhone screen via AirPlay and turn on the camera app. Now I can get up from my desk and go wherever I need to. The student sees me wherever I go. This option is sometimes laggy.
Alternatively, I can log in to the call separately on the iPhone and Mac. This way, there are two instances of me, and if I need to, I can mute the studio desk microphone, and use the phone microphone so that students can hear me wherever I go. I like this option the best because it has the added benefit of showing me what meeting participants see in Zoom.
<div class="
      image-block-outer-wrapper
      layout-caption-below
      design-layout-inline
      combination-animation-none
      individual-animation-none
      individual-text-animation-none
    ">


    <figure class="
          sqs-block-image-figure
          intrinsic
        " style="max-width:1296px">


      <div class="image-block-wrapper">
        <div class="sqs-image-shape-container-element


          has-aspect-ratio
        " style="position: relative;padding-bottom:70.21604919433594%;overflow: hidden">


            <img src="https://images.squarespace-cdn.com/content/v1/5595df9ce4b0ce9ff9ecd1a8/1597075560578-KQFGYGMPES39PW5D9RUH/CleanShot+2020-08-10+at+11.52.56.png" alt="Logging in to the Zoom call on the Mac and iPhone gives me two different camera angles." width="1296" height="910" style="display:block;object-fit: cover;width: 100%;height: 100%;object-position: 50% 50%" loading="lazy">

        </div>
      </div>


      <figcaption class="image-caption-wrapper">
        <div class="image-caption"><p class="">Logging in to the Zoom call on the Mac and iPhone gives me two different camera angles.</p></div>
      </figcaption>


    </figure>


</div>
SoundSource
This process works well once it is set up. But it does take some fiddling around with audio ins and outs to get it right. SoundSource is another app by Rogue Amoeba that takes some of the fiddly-ness out of the equation. It replaces the sound options in your Mac’s menubar, offering your more control and more ease at the same time.
This app saved me from digging into the audio settings of my computer numerous times. In addition to putting audio device selection at a more surface level, it also lets you control the individual volume level of each app, apply audio effects to your apps, and more. One thing I do with it regularly is turn down the volume of just the Zoom app when my students play xylophone.
Rogue Amoeba’s apps will cost you, but they are worth it for those who want more audio control on the Mac. Make sure you take advantage of their educator discount.
EDIT: My teaching set up now includes the use of OBS and an Elago Stream Deck. Read more here.
Conclusion
I went a little overboard here. If this is overwhelming to you, don’t get the idea that you need to do it all. Anyone of these tweaks will advance your setup and teaching.
This post is not specific about the hardware I use. If you care about the brands and models of my gear, check out My Favorite Technology to read more about the specific audio equipment in my setup.
Theresa Hoover Ducassoux joins the show to talk about technology for teaching band at a distance, productivity methodologies, Google apps for personal and school use, Flipgrid, empowering students, and more…
Other topics:
Personal productivity systems and apps
The Getting Things Done Methodology
Teaching band online
Being creative with whatever teaching scenario and schedule your district is moving forward with this fall
Engaging students with musical performance using the Flipgrid video service
Google apps for personal productivity
Google apps for classroom teaching
Organizing files in Google Drive
Automating band warm ups
Chamber music breakout groups using Google Meet and Soundtrap
Getting Google Certified
Her book- Pass the Baton: Empowering All Music Students
Edit:I have received numerous Instagram and Facebook questions about this post and thought I would clarify some things. Scroll to the bottom for more information on choosing the right voice app, my studio set up, and links to the extra gear I use if you want to level up. I am adding these details because some people want to take it beyond the basics. That said, my point stands that you really only need an internet connected cell phone and a voice chat app to teach online.
I’m seeing a lot of questions from teachers flying around social media fussing over new voice chat apps, microphone set up, and elaborate private teaching workflows.
I have moved my private teaching studio of 22 students to live video over the past three weeks. For or better or worse, the technical demands of teaching remote are very simple.
1. Use a phone (the quality is way better) 2. Use FaceTime (unless you can’t then use Google or Skype)
I made a video about it below. I am being kind of sarcastically dry in my tone, but my points are absolutely true. And if you watch it all the way, I actually do have some hardware recommendations to improve the experience. You do not need to be fancy. Most phones already have a voice chat app installed on them.
Zoom is the new hot thing. They are also in the news a lot this week for concerns over privacy (though its arguable that they are doing no worse than any other company out there.) There is absolutely no reason to make your students download a new thing just because it is being talked about. For what its worth, I hear from many educators that Zoom has poor audio quality compared to some of the others. If you want to read more on Zoom, I think this article from The Verge explains their rise to success and the risks that come with it.
Virtual lessons are going very well for me. No one gets into music to learn and play together remotely, but the human connection of music is something that we are just going to have to reinvent for a little while.
There are some real benefits to doing lessons remote. Seeing a student in their own practice space, using their own tools, is instantaneously valuable. I have noticed poor posture, inefficient instrument set up, wacky music stand placement, and more. It is also eye opening to ask a student to use a pencil, tuner, or metronome, and hear them tell you it is in another room! These are things you can’t coach in your own environment. And they spend way more time practicing in theirs than in yours.
Furthermore, a lot of my students need so much coaching on practice process that I am instructing mostly the same way I would in my studio. Teaching them how to break things down, assigning exercises, discussing long term practice goals and pacing. These are ideas I tell them verbally and are therefore not lost over the poor quality of an internet connected call.
I am fortunate that percussion technique has physiological components that are seen out of the body. I can see stick height, movement, placement, and grip, no matter how good or bad the audio quality is.
Many musical features can be heard just as adequately over a voice call: rhythm, style, tempo, and accuracy, to name a few. The major musical qualities I continue to miss out on are dynamics and tone quality which do not translate well over the compression of most smart phone microphones. These are, of course, two of the most important things to a musician. Like I said, this isn’t ideal for the long term, but it is viable for a time.
This is an uncertain time. Technological changes cause us to to question the nature of our work and personal engagements. But you do not need to reinvent your profession. If you have a smartphone and an internet connection, you have everything you need.
Common Questions:
Is that Shure MV88 the best Mic for the money? No! It is actually very cost inefficient compared to other stuff on the market. But it is very convenient! It plugs right into the bottom of the iPhone without adding a cord or significant weight to the device. Click here to buy it. If you want something for a little more money that is way better in audio quality, check out the AKG P120, which I think sounds better than the wildly popular Blue Yeti and Snowball mics. It is also on sale right now.
What tripod do you use?Amazon Essentials. It’s cheaply built, but effective. It will hold together if it doesn’t leave your studio.
Why are you so opinionated about voice apps? I try to use what works for my students. If we both happen to have an iPhone, I prefer FaceTime because it has the best audio and video quality of all the apps I have tried. Google apps are second best, followed by Skype/WhatsApp. Zoom was by far the weakest audio/video quality and required the most fussing around to set up.
Do you have connectivity issues? Rarely, but most of my students have more than one of the voice chat apps installed and we can usually get the second attempt up and running.
What is your studio set up like? Lately, I position the iPhone on my desk like a webcam so that I can see my sheet music (on iPad) and notes (on Mac) and make eye contact with students at the same time. I keep a snare drum to my side and bring the camera with tripod around the room in my studio to model on other percussion instruments. See picture below.
Wait! That picture is complicated! You said all I need is a phone and a voice app! Yes, this is all you need. I also choose to share my students notes with them over a Google Calendar and read my music digitally. You don’t have to use technology for those things. If you do, you can use secondary devices. Alternatively, you could start a voice call on the iPad or Mac and then use other apps on the screen while the voice call keeps running in the background. Your phone is going to give you the best quality video though.